Coupling Alignment
Coupling Alignment
Good service life of the pump and driver
depends upon good alignment through the
flexible coupling. If the electric motor was
mounted at the factory, the pump and motor
were in alignment when shipped.
The alignment between the pump and driver should be inspected after installation to ensure that transportation or other handling has not caused misalignment of the unit.
Poor alignment may cause failure of the coupling, pump, motor, or bearings.
Alignment must not be attempted until the base is in position and the mounting and flange bolts have been tightened.
The recommended procedure for coupling
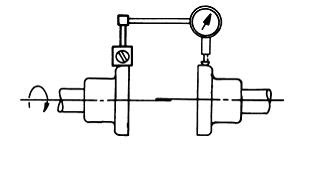
alignment is with the use of a dial indicator,
as illustrated in Figures 1 and 2.
The dial indicator is attached to one coupling halfwith the indicator button resting on the O.D. of the other coupling half to measure offset HALCO 1780 “W” Maintenance Page 3 misalignment.
To measure angular misalignment, the indicator is positioned so that the buttons rest on the face, near the O.D., of the other coupling half.
Rotate the shaft and dial indicator one revolution while the other shaft remains stationary and note the T.I.R.
Unless otherwise specified by the coupling manufacturer, offset misalignment should be limited to 0.005 inches T.I.R.
Adjust the alignment by loosening the pump or driver mounting bolts and retighten or shim as required.
Figure 1
Measuring Offset Misalignment With A Dial Gauge
Figure 2
Measuring Angular Misalignment With A Dial Gauge
Measuring Angular Misalignment With A Dial Gauge
In areas where a dial indicator arrangement is not available, an adequate job of alignment can be done with a straightedge. This method is especiallyuseful if the coupling used contains a rubber drive element.
To check offset misalignment, lay the straightedge in line with the shafts on the O.D.’s of the coupling halves. There should be no gaps under the straightedge. Check two locations 90 degrees apart. Angular misalignment can be checked by measuring the gap between coupling half faces. There should be no more than a 1/64 inch gap under the straightedge or a 1/64 inch variation in the gap between the coupling halves. See Figures 1A and 2A.
To check offset misalignment, lay the straightedge in line with the shafts on the O.D.’s of the coupling halves. There should be no gaps under the straightedge. Check two locations 90 degrees apart. Angular misalignment can be checked by measuring the gap between coupling half faces. There should be no more than a 1/64 inch gap under the straightedge or a 1/64 inch variation in the gap between the coupling halves. See Figures 1A and 2A.
Figure 1A
Measuring Offset Misalignment Using a Straightedge
Measuring Offset Misalignment Using a Straightedge
Figure 2A
Measuring Angular Misalignment Using A Straightedge
Note: Further reference on coupling alignment can be found in Hydraulic Institute Standards, 13th edition, pages 177, 120.


Comments
You may introduce errors the way you have described it here.
Finding job isn't hard as long as you are very determined. Anyways, you can hunt mechanical engineering jobs from www.freelancer.com
Don't forget my coupon code which is NUTSANDBOLTS
Good luck!